大家好,我是小寒。
今天给大家分享一个强大得算法模型,RCNN
RCNN(Region-based Convolutional Neural Networks)是一种用于目标检测的经典算法,它通过将卷积神经网络(CNN)与区域提议算法结合起来,实现了在图像中定位和分类目标的功能。
RCNN 算法的核心思想是将图像分成若干候选区域,然后对每个候选区域进行分类和定位。
想象一下,你身处熙熙攘攘的街市,在人群中寻找你的朋友。
你的目光四处扫视,关注不同的人,一次评估一个人,直到找到你的朋友。这个过程让你在做出决定之前专注于特定区域,类似于 RCNN(基于区域的卷积神经网络)。
RCNN 算法的详细描述
- 区域提议
RCNN 首先使用选择性搜索(Selective Search)算法来生成候选区域。
选择性搜索算法通过图像分割技术,将图像分割成许多小的片段,然后合并这些片段以生成候选区域。
这些候选区域的数量通常为 2000 个左右。

- 特征提取
对于每个候选区域,RCNN 将其调整为相同的大小(例如 224x224 像素),并使用预训练的 CNN 模型(如AlexNet)提取其特征。
CNN 的卷积层会生成一个固定长度的特征向量,这些特征向量代表了候选区域的视觉信息。
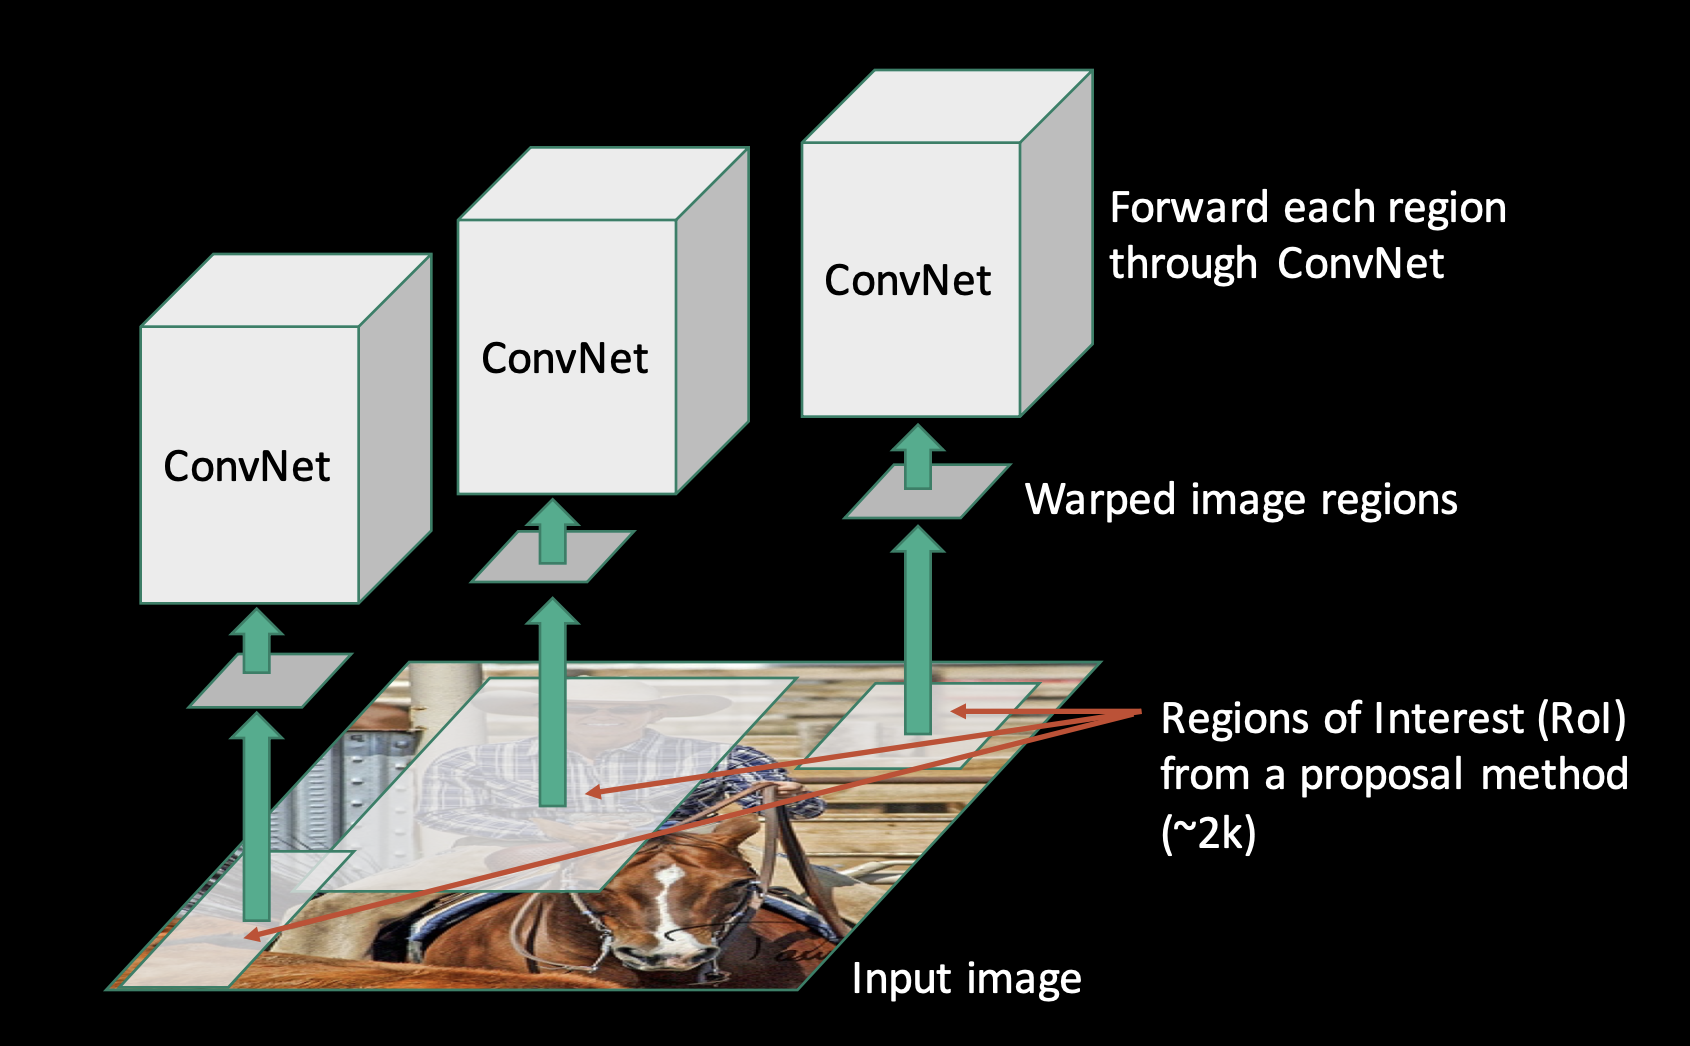
- 分类和回归
使用提取的特征向量,RCNN 对每个候选区域进行分类,并使用线性回归来回归边界框。
分类器通常是一个线性支持向量机(SVM),用于确定候选区域属于哪个类别。
回归器用于调整候选区域的边界框,使其更准确地定位目标。
区域提议技术的机制
RCNN 第一步是生成区域提议。这是选择性搜索算法发挥主要作用的地方。
想象一下,你得到了一个庞大而复杂的拼图。你不必试图一次性解决所有问题,而是先根据颜色、纹理和边缘将看似属于同一类的部分组合在一起。这基本上就是选择性搜索对图像所做的工作。
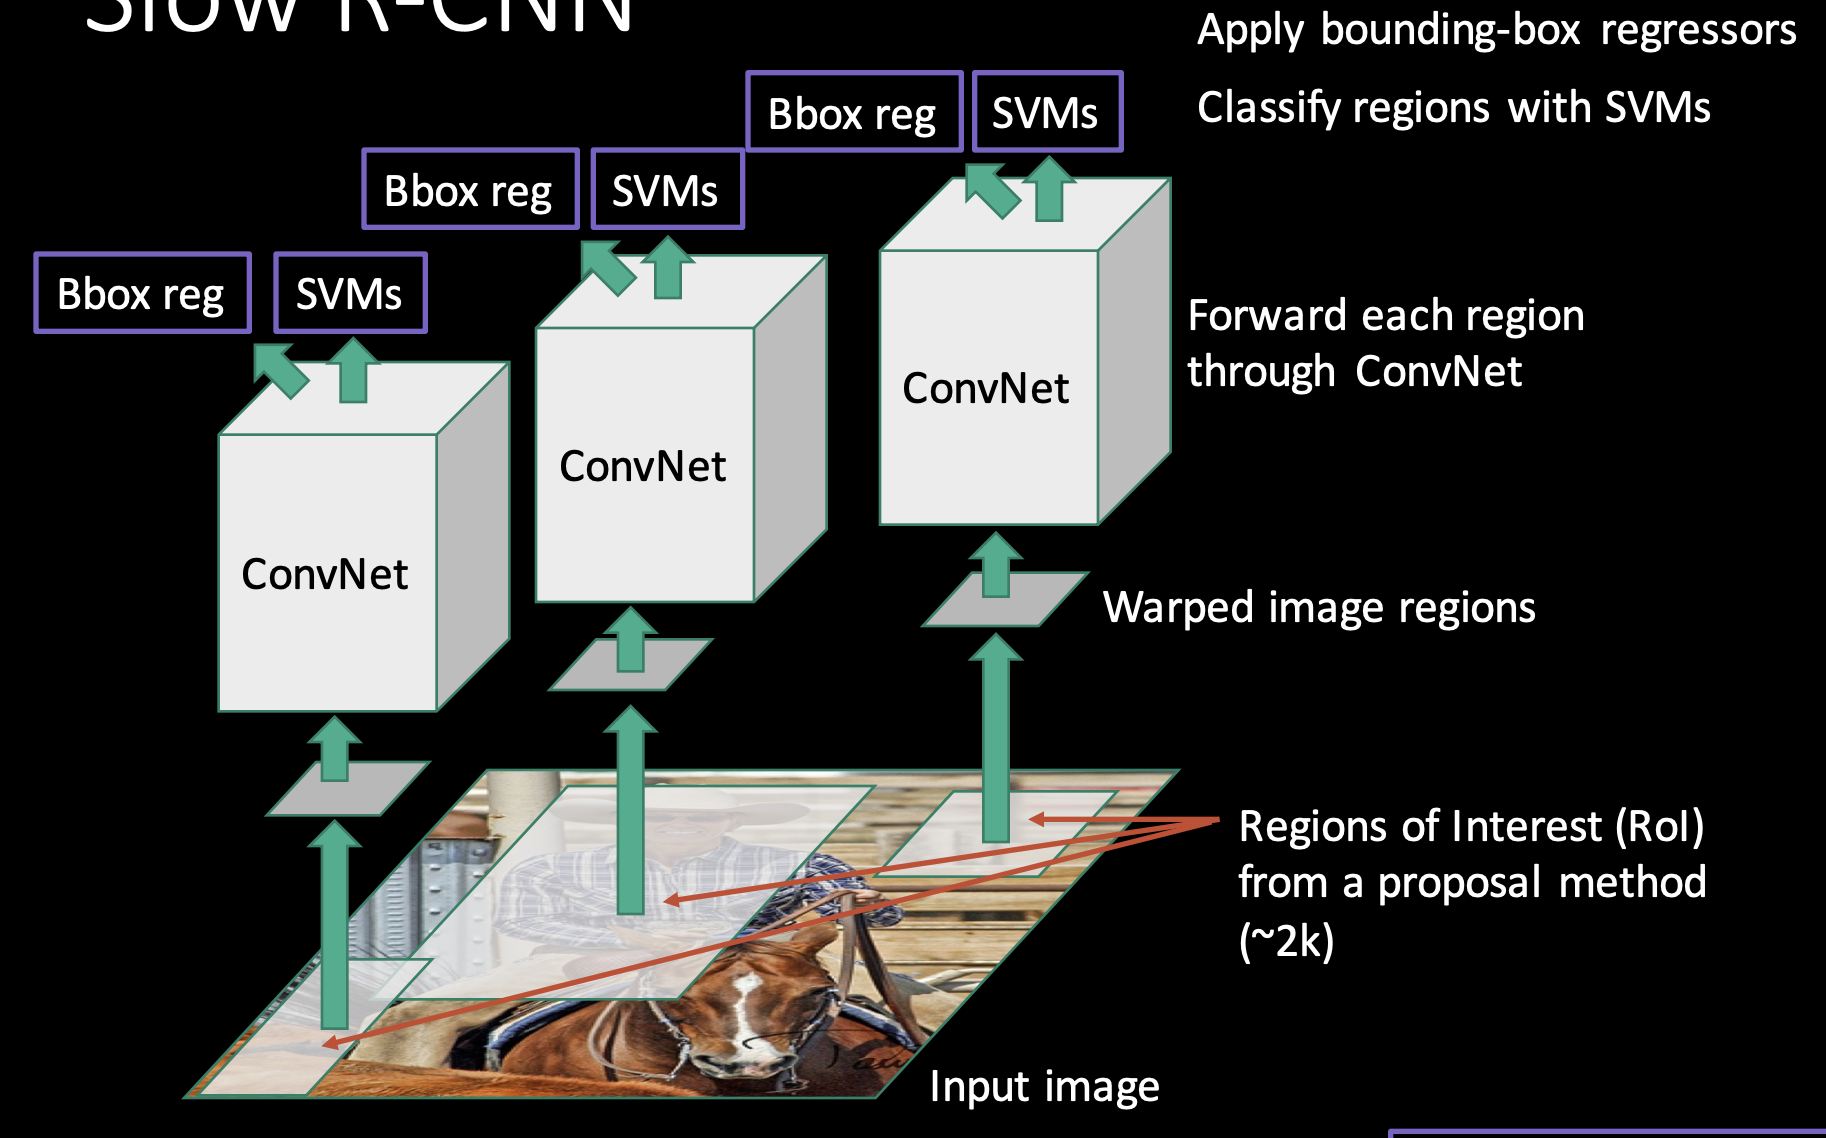
选择性搜索的工作原理
选择性搜索的核心思想是通过逐步合并相似的图像区域,生成一组候选区域。这些候选区域可以用于后续的目标检测任务。
其具体步骤如下:
- 图像分割
选择性搜索首先将输入图像分割成一组初始的超像素(superpixels),这些超像素是一些小的、相邻像素值相似的区域。
通常使用 Felzenszwalb 和 Huttenlocher 的图像分割算法进行这一步骤,该算法能够快速生成一组超像素。
假设输入图像如下所示

经过图像分割后的图像为。
- 区域合并(Region Merging)
在生成初始超像素之后,选择性搜索通过逐步合并相似的区域来生成更大的候选区域。
合并过程基于以下四种相似性度量:
- 颜色相似性,比较两个区域的颜色直方图,如果两个区域的颜色分布相似,则合并它们。
- 纹理相似性,比较两个区域的纹理特征,如果纹理相似,则合并它们。
- 尺寸相似性,比较两个区域的大小,如果两个区域的大小相似,则合并它们。
- 填充相似性,检查两个区域合并后的区域是否能够紧密填充,如果能,则合并它们。
合并过程是迭代进行的,每次合并后更新相似性度量,直到满足停止条件(如合并次数达到上限或没有相似的区域可以合并)。

- 候选区域生成(Generation of Region Proposals)
在合并过程中,选择性搜索会生成一组候选区域。这些候选区域可能包含目标物体,将用于后续的分类和回归步骤。
RCNN 实现
下面是一个简化的 Python 模板,概述了实现 RCNN 模型的基本步骤。
此模板假设使用预先训练的 CNN(如 VGG-16)进行特征提取,不包括分类器或回归模型的训练,这需要大量数据和计算资源。
import cv2
import numpy as np
from keras.applications.vgg16 import VGG16, preprocess_input
from keras.preprocessing.image import img_to_array
from selective_search import selective_search  # This is a placeholder function for selective search

# Load a pre-trained VGG16 model for feature extraction
base_model = VGG16(weights='imagenet', include_top=False)

def preprocess_image(image_path):
    # Load image, convert to array, and preprocess for VGG16
    image = cv2.imread(image_path)
    image = cv2.resize(image, (227, 227))  # Resize image to fixed size
    image = img_to_array(image)
    image = np.expand_dims(image, axis=0)
    image = preprocess_input(image)
    return image

def get_region_proposals(image_path):
    # Placeholder function for generating region proposals
    # In practice, use selective search or another method
    regions = selective_search(image_path)
    return regions

def extract_features(image_path, regions):
    features = []
    for (x, y, w, h) in regions:
        # Crop and preprocess the region
        region_image = preprocess_image(image_path)[y:y+h, x:x+w]
        # Extract features using the base CNN model
        region_features = base_model.predict(region_image)
        features.append(region_features.flatten())
    return features

# Example usage
image_path = 'path/to/image.jpg'
regions = get_region_proposals(image_path)
features = extract_features(image_path, regions)
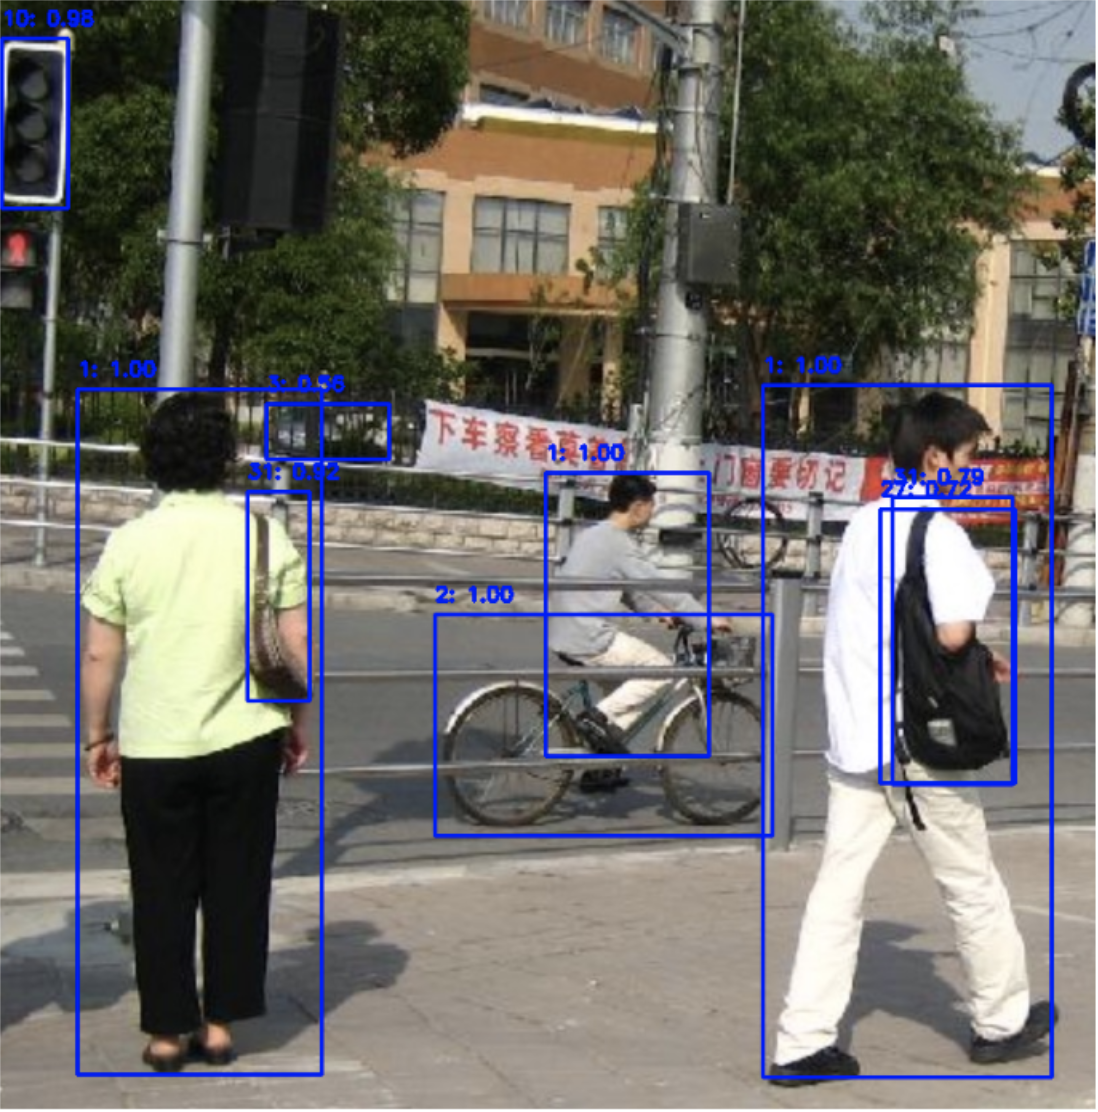
使用预训练的 RCNN 实现目标检测
import torch
import torchvision
from PIL import Image
import matplotlib.pyplot as plt
import numpy as np
import random
import cv2

# 加载预训练的 Mask R-CNN 模型
model = torchvision.models.detection.maskrcnn_resnet50_fpn(pretrained=True)
model.eval()

# 读取输入图像并进行预处理
def load_image(image_path):
    image = Image.open(image_path).convert("RGB")
    transform = torchvision.transforms.Compose([
        torchvision.transforms.ToTensor()
    ])
    return transform(image).unsqueeze(0)

# 可视化分割结果
def visualize(image, masks, boxes, labels, scores, threshold=0.5):
    image = image.permute(1, 2, 0).cpu().numpy()
    image = cv2.cvtColor(image, cv2.COLOR_RGB2BGR)

    num_masks = masks.shape[0]
    for i in range(num_masks):
        if scores[i] >= threshold:
            mask = masks[i, 0].mul(255).byte().cpu().numpy()
            color = (255, 0, 0)
            for c in range(3):
                image[:, :, c] = np.where(mask == 255, image[:, :, c] * 0.5 + 0.5 * color[c], image[:, :, c])

            box = boxes[i].detach().cpu().numpy()
            cv2.rectangle(image, (int(box[0]), int(box[1])), (int(box[2]), int(box[3])), color,2)
            cv2.putText(image, f'{labels[i]}: {scores[i]:.2f}', (int(box[0]), int(box[1]) - 10),
                        cv2.FONT_HERSHEY_SIMPLEX, 0.5, color, 2)

    plt.figure(figsize=(12, 9))
    plt.imshow(cv2.cvtColor(image, cv2.COLOR_BGR2RGB))
    plt.axis('off')
    plt.show()

# 输入图像路径
image_path = "1.jpg"

# 加载图像
image_tensor = load_image(image_path)

# 进行推断
with torch.no_grad():
    predictions = model(image_tensor)

# 提取结果
pred_masks = predictions[0]['masks']
pred_boxes = predictions[0]['boxes']
pred_labels = predictions[0]['labels']
pred_scores = predictions[0]['scores']

# 加载原始图像用于可视化
image = Image.open(image_path).convert("RGB")
image = torchvision.transforms.ToTensor()(image)

# 可视化分割结果
visualize(image, pred_masks, pred_boxes, pred_labels, pred_scores)
RCNN算法的优缺点
优点:
- 提出了将 CNN 应用于目标检测的新方法,显著提高了检测精度。
- 采用了预训练的 CNN 模型,利用了大规模图像分类数据集的优势。
缺点:
- 计算成本高,处理每个候选区域都需要单独进行前向传播,导致速度慢。
- 存储需求大,需要存储大量候选区域的特征向量。
为了克服 RCNN 的不足,研究人员提出了多种改进版本,包括 Fast RCNN、Faster RCNN 和 Mask RCNN。
有关 Fast RCNN、Faster RCNN 和 Mask RCNN 的详细介绍,我们会在后续的文章中逐步揭晓,敬请期待了~
如果觉得文章不错,点赞、转发安排起来~